External Wall Insulation & Insulated Render Systems

External wall insulation can improve the appearance, comfort and thermal performance of suitable properties while creating a fresh rendered finish.

Solid-Wall Specialists
Thermal Performance Improvement
Fresh Rendered Finish
Full System Supply & Install
Clear Written Quotes

External Wall Insulation Explained

External wall insulation involves fixing insulation boards to the outside of a property and finishing the system with reinforced base coats and a protective render finish. The result is a property with improved thermal performance and a fresh modern external appearance.

EWI can be particularly beneficial for older solid-wall properties where internal insulation would be disruptive or impractical. The system can also be used on commercial buildings and housing stock upgrade projects.

Discuss Your Project
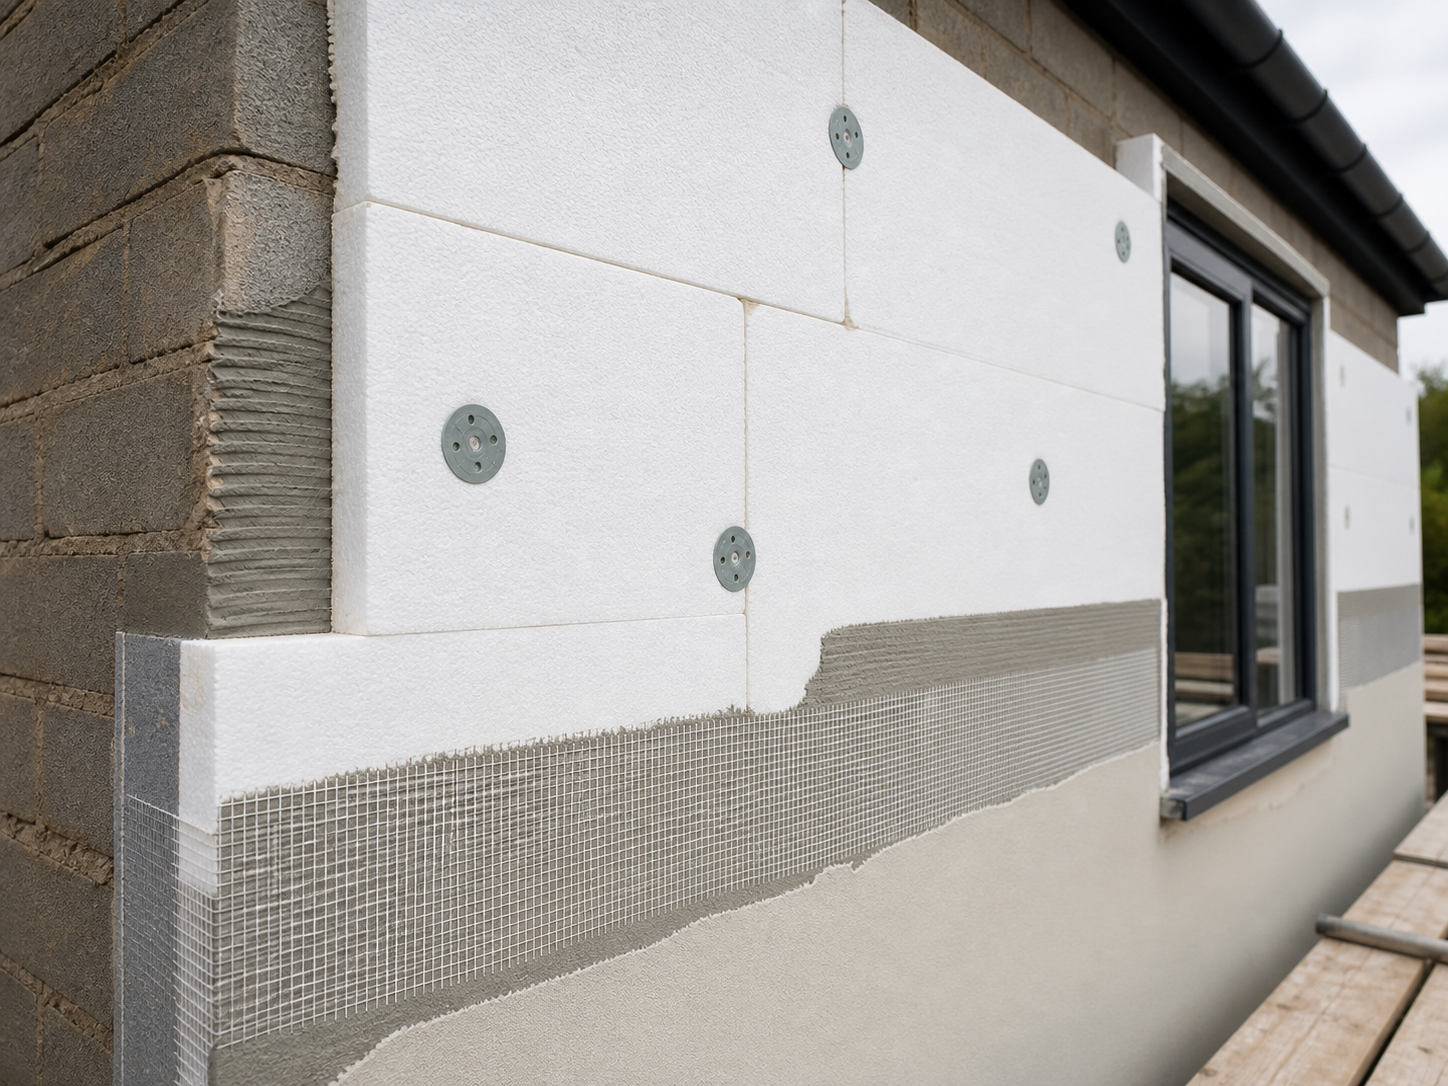
External wall insulation boards prepared for render
EWI System Layers
1 Existing wall / substrate
2 Adhesive and mechanical fixings
3 Insulation board
4 Reinforced base coat
5 Reinforcing mesh
6 Primer
7 Render finish coat
8 Detailing and trims

Benefits of External Wall Insulation

Improved Thermal Performance

Reduces heat loss through external walls — particularly effective on older solid-wall properties.

Fresh External Appearance

Updates the look of a property with a clean, modern rendered finish in a range of colours and textures.

Reduced Heat Loss

Adds an insulation layer on the outside of the building without disrupting internal space.

Durable Finish

The render system protects the insulation and the building from weather, moisture and general wear.

Suitable for Solid-Wall Properties

An alternative to internal insulation for older or period properties where disruption would be significant.

Multiple Colour & Texture Options

Choose from a wide range of silicone render colours and textures to match the surrounding area or preference.

Suitable Projects

EWI is not always suitable for every property. The condition of the existing wall, planning constraints, property type and budget all affect suitability. We assess each project individually and advise honestly on whether EWI is appropriate.

  • Detached and semi-detached homes
  • Older solid-wall properties
  • Major renovation projects
  • Commercial buildings
  • Apartment blocks
  • Housing stock upgrade programmes
  • Properties needing facade improvement
Check Suitability

Important Considerations

EWI requires careful planning and assessment before installation. Key factors include:

  • Planning permission may be needed in some areas
  • Suitable for solid-wall properties — cavity walls assessed separately
  • Scaffolding is typically required
  • Building control sign-off may be applicable
  • Detailing around windows, doors and soffits is critical

EWI Installation Process

Step 01

Property Assessment

We review the property type, wall construction, existing condition and suitability for EWI before recommending a system or providing any pricing.

  • Wall construction type identified
  • Condition of existing substrate assessed
  • EWI suitability confirmed
Step 02

Suitability Review

We confirm whether EWI is the right approach and advise on the insulation thickness, render finish and any planning considerations that may apply.

  • Insulation thickness and system recommended
  • Planning constraints and permissions flagged
  • Budget and specification options outlined
Step 03

Specification & Quotation

A written quote covering insulation boards, base coat, reinforcing mesh, render finish, trims and all access requirements — fully itemised with no hidden costs.

  • Board type, base coat and mesh specified
  • Render finish and colour selected
  • Full itemised written quote provided
Step 04

Access & Scaffolding Planning

Scaffolding requirements are agreed and access planned to allow safe, efficient installation across all elevations without unnecessary disruption.

  • Scaffolding type and layout agreed
  • Access openings and working platform confirmed
  • Health and safety requirements addressed
Step 05

Preparation

The existing wall surface is cleaned, repaired where necessary and primed for adhesion — preparation quality directly affects the long-term performance of the system.

  • Existing wall cleaned and repaired
  • Substrate primed where required
  • Fixings and trims positioned and confirmed
Step 06

Insulation Installation

Boards are fixed using the correct combination of adhesive and mechanical fixings. Trims and beads are installed at all windows, doors and junctions.

  • Boards fixed with adhesive and mechanical fixings
  • Trims and beads fitted at all junctions
  • Board joints staggered and substrate checked
Step 07

Reinforced Base Coat & Mesh

A reinforced base coat with embedded fibreglass mesh is applied over the insulation boards to create a stable, impact-resistant substrate for the final render.

  • Base coat applied across full insulation surface
  • Reinforcing mesh embedded and lapped correctly
  • Base coat cured fully before render application
Step 08

Final Render Finish

The chosen render system is applied to the agreed colour and texture. All reveals, sills and junctions are finished cleanly and inspected before scaffold removal.

  • Render system applied to agreed specification
  • All reveals, sills and junctions finished cleanly
  • Full coverage inspected before scaffold comes down
Step 09

Handover & Aftercare

Scaffolding is removed, the site is cleaned down and all warranty, guarantee and aftercare documentation is provided at the point of handover.

  • Scaffolding removed and site cleared
  • Warranty and guarantee documentation provided
  • Aftercare and maintenance guidance given

EWI FAQs

Discuss Your EWI Project

Share your property details, photos or drawings. We'll assess suitability, advise on the right system and provide a full written quotation covering insulation, base coat and render finish.